This is a server and client sample that compliment each other and would need to be modified to fit your environment. It will support dual factor (AD+Certificate) VPN.
Sample server.conf configuration
# This file is for the server side #
# of a many-clients <-> one-server #
# OpenVPN configuration.
# Which local IP address should OpenVPN
# listen on? (optional)
local a.b.c.d
# Which TCP/UDP port should OpenVPN listen on?
port 443
# TCP or UDP server?
proto tcp
# "dev tap" will create an ethernet tunnel.
dev tap0
# OpenVPN can use a PKCS #12 formatted key file
# (see "pkcs12" directive in man page).
pkcs12 /etc/openvpn/easy-rsa/keys/openvpnServer.pfx
#Allows for AD authentication
plugin /usr/share/openvpn/plugin/lib/openvpn-auth-pam.so login
# Diffie hellman parameters.
dh /etc/openvpn/easy-rsa/keys/dh1024.pem
# Maintain a record of client <-> virtual IP address
# associations in this file.
ifconfig-pool-persist ipp.txt
# Configure server mode for ethernet bridging.
server-bridge 10.X.X.X 10.X.X.255 10.X.1.1 10.X.1.100
# Push routes to the client to allow it
# to reach other private subnets behind
# the server.
push "route 10.X.X.X 255.X.X.X 10.X.X.1"
# Certain Windows-specific network settings
# can be pushed to clients, such as DNS
# or WINS server addresses.
push "dhcp-option WINS 10.X.X.X"
push "dhcp-option DNS 10.X.X.X"
# Uncomment this directive to allow different
# clients to be able to "see" each other.
client-to-client
# The keepalive directive causes ping-like
# messages to be sent back and forth over
# the link
keepalive 10 120
# For extra security beyond that provided
# by SSL/TLS, create an "HMAC firewall"
# to help block DoS attacks and UDP port flooding.
tls-auth /etc/openvpn/easy-rsa/keys/ta.key 0
# Enable compression on the VPN link.
comp-lzo
# The maximum number of concurrently connected
# clients we want to allow.
max-clients 50
# It's a good idea to reduce the OpenVPN
# daemon's privileges after initialization.
user nobody
group nobody
# The persist options will try to avoid
# accessing certain resources on restart
persist-key
persist-tun
# Use log or log-append to override this default.
log-append openvpn.log
# Set the appropriate level of log
# file verbosity.
verb 3
# Silence repeating messages. At most 20
# sequential messages of the same message
# category will be output to the log.
mute 20
Sample client.ovpn configuration file
# client file has a .ovpn extension #
client
dev tap
proto tcp
#***********************************# remote server
remote openvpn.yourdomain.com 443
#***********************************#
resolv-retry infinite
nobind
persist-key
persist-tun
tls-auth "C:\\Program Files\\OpenVPN\\config\\ta.key" 1
ca "C:\\Program Files\\OpenVPN\\config\\CA.cer"
#
# #
#***********************************#
#Change the name here to your CERT *#
#***********************************#
cryptoapicert "SUBJ:CLIENT.YOURDOMAIN.COM"
#***********************************#
#
# #
auth-user-pass
comp-lzo
verb 3
route-method exe
route-delay 2
Showing posts with label Active Directory. Show all posts
Showing posts with label Active Directory. Show all posts
04 August 2009


03 August 2009
Dual factor OpenVPN with Active Directory and Certificate Services (Part 4 of 4)
4. Client Installation
Client installation involves three basic steps:
1. Get a certificate that identifies the client computer, if this is not already done.
2. Install the OpenVPN package, preferably one pre-packaged with all the configuration files:
a ta.key,
a CA certificate,
a configuration file.
3. Change a single line in the OpenVPN configuration file to match the client machine name.
4.1 Getting a certificate
If this is not handled by Group Policy, a certificate can be gotten manually, assuming you have a PKI in house already.
Before starting, the machine must be a domain member and on the network.
Go to Start > run > and type mmc
Add "Certificates" snap-in (Computer account).
Open the "Personal" folder; Right Click > All Tasks > Request New Certificate.
Select "Computer" as the type of request
Select and you are done
4.2 Install the OpenVPN executable
Install with defaults.
During install, you may get a warning about an unsigned driver. This is normal. Click "CONTINUE".
4.3 Configure the client
Open the C:\Program Files\OpenVPN\config folder; Open the ovpn file. At the cryptoapicert line, change the "MACHINENAME" to the name of the client machine, i.e. YOURCLIENT.YOURDOMAIN.COM
cryptoapicert "SUBJ:YOURCLIENT.YOURDOMAIN.COM"
VISTA/Win7: The shortcut should be set to run as Administrator.
You are ready to go.
Client installation involves three basic steps:
1. Get a certificate that identifies the client computer, if this is not already done.
2. Install the OpenVPN package, preferably one pre-packaged with all the configuration files:
a ta.key,
a CA certificate,
a configuration file.
3. Change a single line in the OpenVPN configuration file to match the client machine name.
4.1 Getting a certificate
If this is not handled by Group Policy, a certificate can be gotten manually, assuming you have a PKI in house already.
Before starting, the machine must be a domain member and on the network.
Go to Start > run > and type mmc
Add "Certificates" snap-in (Computer account).
Open the "Personal" folder; Right Click > All Tasks > Request New Certificate.
Select "Computer" as the type of request
Select
4.2 Install the OpenVPN executable
Install with defaults.
During install, you may get a warning about an unsigned driver. This is normal. Click "CONTINUE".
4.3 Configure the client
Open the C:\Program Files\OpenVPN\config folder; Open the ovpn file. At the cryptoapicert line, change the "MACHINENAME" to the name of the client machine, i.e. YOURCLIENT.YOURDOMAIN.COM
cryptoapicert "SUBJ:YOURCLIENT.YOURDOMAIN.COM"
VISTA/Win7: The shortcut should be set to run as Administrator.
You are ready to go.
31 July 2009
Dual factor OpenVPN with Active Directory and Certificate Services (Part 3 of 4)
3 Building OpenVPN
It is possible to build from scratch, but here are the instructions for using RPM packages. LZO is the compression library package to boost OpenVPN's performance.
Specifically, these are the packages:
lzo2-2.02-3.el5.rf.i386.rpm
lzo2-devel-2.02-3.el5.rf.i386.rpm (optional)
openvpn-2.0.9-1.el5.rf.i386.rpm
3.1 Build and install the bridge.
The bridge consists of bridge-utils and sysfsutils. This example has an older version.
# yum install bridge-utils:
(1/2): sysfsutils-1.3.0-1 100% |=========================| 64 kB 00:01
(2/2): bridge-utils-1.0.6 100% |=========================| 27 kB 00:00
Running Transaction Test
Finished Transaction Test
Transaction Test Succeeded
Running Transaction
Installing: sysfsutils ######################### [1/2]
Installing: bridge-utils ######################### [2/2]
Installed: bridge-utils.i386 0:1.0.6-1.2
Dependency Installed: sysfsutils.i386 0:1.3.0-1.2.1
Complete!
3.2 Install OpenVPN
The LZO libraries are found at http://www.oberhumer.com/opensource/lzo/. Or you can search for them on RPMfind. LZO is used for data compression. The OpenVPN version 2.0.9 is a bit old, but it is widely supported and is the latest stable. The RC candidates can be explored in future deployments.
Installation is simple:
# rpm -ivh lzo-2.02-2.el5.1.i386.rpm
# rpm -ivh openvpn-2.0.9-1.el5.rf.i386.rpm
# pwd
/usr/share/doc/openvpn-2.0.9
# cp -pR * /etc/openvpn
That is it. You are done – but for one thing, disable OpenVPN in ntsysv. We will use a script to start it, because we need the bridge up before OpenVPN.
3.3 Create the PKI infrastructure
You should already have Active Directory Certificates Services up and running. You will have a total of three keys/certificates at the end:
• an identification certificate from the CA
• a D-H key, used for TLS/SSL encryption
• a TA.key, which prevents untrusted clients from even connecting to the system
3.3.1 Get the identification certificate
Go to https://yourdomain/certsrv/
Select the ComputerALL Template
"Name" is the name of the machine, not your name…
INCLUDE ALL CERTIFICATES = check (this package must include the CA path and certificate)
ENABLE STRONG PROTECTION = no check
Get the PFX file and move it on the vpn server. Use MOVE, not COPY. We do not want multiple copies of this file.
If you do not want to enter a password every time you start OpenVPN, then do not include a password on the PFX file.
On the OpenVPN box:
# pwd
/etc/openvpn/easy-rsa
# mkdir keys
# chmod 700 keys
# mv [source] openvpnServer.pfx
# chmod 600 openvpnServer.pfx
3.3.2 Generate the DH key
Edit the vars file to generate the DH key in the easy-rsa folder. Keep the key length at 1024.
export KEY_COUNTRY=YOURCOUNTRY
export KEY_PROVINCE=YOURSTATE
export KEY_CITY=YOURCITY
export KEY_ORG="YOURGROUP"
export KEY_EMAIL="noreply@yourdomain.com"
Then build the key.
# . ./vars # . ./build-dh
3.3.3 TA key generation
Create the ta key for added security. It is optional, but the causes OpenVPN to drop any connection handshake attempt that does not have the ta key.
# pwd
/etc/openvpn/easy-rsa/keys
# openvpn --genkey --secret ta.key # ls dh1024.pem ta.key openvpnServer.pfx
3.4 Create the bridge
The bridge scripts can be found in the sample-scripts folder. The bridge is what will be used so full access is possible for clients.
# cp -p bridge-start bridge-stop /etc
# chmod 700 bridge-start bridge-stop
# vi /etc/bridge-start
## Define physical ethernet interface to be bridged
## with TAP interface(s) above.
eth="eth0"
eth_ip="10.X.X.X"
eth_netmask="255.0.0.0"
eth_broadcast="10.X.X.255"
Then start the bridge.
# /etc/bridge-start
If everything is working it should look like this, with a br0 and a tap0 – the tap does NOT have an ip address, everything else should:
# ifconfig
br0 Link encap:Ethernet HWaddr 00:0C:29:1F:F7:F2
inet addr:10.X.X.X Bcast:10.X.X.255 Mask:255.0.0.0
UP BROADCAST RUNNING MULTICAST MTU:1500 Metric:1
eth0 Link encap:Ethernet HWaddr 00:0C:29:1F:F7:F2
inet addr:10.X.X.X Bcast:10.X.X.255 Mask:255.0.0.0
UP BROADCAST RUNNING PROMISC MULTICAST MTU:1500 Metric:1
eth1 Link encap:Ethernet HWaddr 00:0C:29:1F:F7:FC
inet addr:1.X.X.X Bcast:1.X.X.255 Mask:255.255.255.0
UP BROADCAST RUNNING MULTICAST MTU:1500 Metric:1
lo Link encap:Local Loopback
inet addr:127.0.0.1 Mask:255.0.0.0
UP LOOPBACK RUNNING MTU:16436 Metric:1
tap0 Link encap:Ethernet HWaddr 7A:DD:C3:66:AA:2C
UP BROADCAST RUNNING PROMISC MULTICAST MTU:1500 Metric:1
You also have to add these to allow traffic. They will work, even if iptables is off.
# iptables -A INPUT -i tap0 -j ACCEPT
# iptables -A INPUT -i br0 -j ACCEPT
# iptables -A FORWARD -i br0 -j ACCEPT
3.5 Starting at boot
Now, set it all up to start automatically. You likely will need to add a route command so the VPN is available on the inside network from areas other than the subnet.
# pwd
#/etc/rc.d/rc3.d
# vi S99local
/etc/bridge-start
service openvpn start
route add -net 10.0.0.0 netmask 255.0.0.0 gw 10.X.X.X
Then get the server.conf file configured.
Make sure this line is in there:
plugin /usr/share/openvpn/plugin/lib/openvpn-auth-pam.so login
Details of what should be in the conf file can be found by looking at a sample.
Then start the openvpn service:
service openvpn start
If there is a FAILURE to start, check the openvpn.log to see what is going on. I find tail –f in a separate window is very handy, as it is a live look at the log file.
vi /etc/sysconfig/network and set the gateway to the outside address.
Next, we will set up the client.
It is possible to build from scratch, but here are the instructions for using RPM packages. LZO is the compression library package to boost OpenVPN's performance.
Specifically, these are the packages:
lzo2-2.02-3.el5.rf.i386.rpm
lzo2-devel-2.02-3.el5.rf.i386.rpm (optional)
openvpn-2.0.9-1.el5.rf.i386.rpm
3.1 Build and install the bridge.
The bridge consists of bridge-utils and sysfsutils. This example has an older version.
# yum install bridge-utils:
(1/2): sysfsutils-1.3.0-1 100% |=========================| 64 kB 00:01
(2/2): bridge-utils-1.0.6 100% |=========================| 27 kB 00:00
Running Transaction Test
Finished Transaction Test
Transaction Test Succeeded
Running Transaction
Installing: sysfsutils ######################### [1/2]
Installing: bridge-utils ######################### [2/2]
Installed: bridge-utils.i386 0:1.0.6-1.2
Dependency Installed: sysfsutils.i386 0:1.3.0-1.2.1
Complete!
3.2 Install OpenVPN
The LZO libraries are found at http://www.oberhumer.com/opensource/lzo/. Or you can search for them on RPMfind. LZO is used for data compression. The OpenVPN version 2.0.9 is a bit old, but it is widely supported and is the latest stable. The RC candidates can be explored in future deployments.
Installation is simple:
# rpm -ivh lzo-2.02-2.el5.1.i386.rpm
# rpm -ivh openvpn-2.0.9-1.el5.rf.i386.rpm
# pwd
/usr/share/doc/openvpn-2.0.9
# cp -pR * /etc/openvpn
That is it. You are done – but for one thing, disable OpenVPN in ntsysv. We will use a script to start it, because we need the bridge up before OpenVPN.
3.3 Create the PKI infrastructure
You should already have Active Directory Certificates Services up and running. You will have a total of three keys/certificates at the end:
• an identification certificate from the CA
• a D-H key, used for TLS/SSL encryption
• a TA.key, which prevents untrusted clients from even connecting to the system
3.3.1 Get the identification certificate
Go to https://yourdomain/certsrv/
Select the ComputerALL Template
"Name" is the name of the machine, not your name…
INCLUDE ALL CERTIFICATES = check (this package must include the CA path and certificate)
ENABLE STRONG PROTECTION = no check
Get the PFX file and move it on the vpn server. Use MOVE, not COPY. We do not want multiple copies of this file.
If you do not want to enter a password every time you start OpenVPN, then do not include a password on the PFX file.
On the OpenVPN box:
# pwd
/etc/openvpn/easy-rsa
# mkdir keys
# chmod 700 keys
# mv [source] openvpnServer.pfx
# chmod 600 openvpnServer.pfx
3.3.2 Generate the DH key
Edit the vars file to generate the DH key in the easy-rsa folder. Keep the key length at 1024.
export KEY_COUNTRY=YOURCOUNTRY
export KEY_PROVINCE=YOURSTATE
export KEY_CITY=YOURCITY
export KEY_ORG="YOURGROUP"
export KEY_EMAIL="noreply@yourdomain.com"
Then build the key.
# . ./vars # . ./build-dh
3.3.3 TA key generation
Create the ta key for added security. It is optional, but the causes OpenVPN to drop any connection handshake attempt that does not have the ta key.
# pwd
/etc/openvpn/easy-rsa/keys
# openvpn --genkey --secret ta.key # ls dh1024.pem ta.key openvpnServer.pfx
3.4 Create the bridge
The bridge scripts can be found in the sample-scripts folder. The bridge is what will be used so full access is possible for clients.
# cp -p bridge-start bridge-stop /etc
# chmod 700 bridge-start bridge-stop
# vi /etc/bridge-start
## Define physical ethernet interface to be bridged
## with TAP interface(s) above.
eth="eth0"
eth_ip="10.X.X.X"
eth_netmask="255.0.0.0"
eth_broadcast="10.X.X.255"
Then start the bridge.
# /etc/bridge-start
If everything is working it should look like this, with a br0 and a tap0 – the tap does NOT have an ip address, everything else should:
# ifconfig
br0 Link encap:Ethernet HWaddr 00:0C:29:1F:F7:F2
inet addr:10.X.X.X Bcast:10.X.X.255 Mask:255.0.0.0
UP BROADCAST RUNNING MULTICAST MTU:1500 Metric:1
eth0 Link encap:Ethernet HWaddr 00:0C:29:1F:F7:F2
inet addr:10.X.X.X Bcast:10.X.X.255 Mask:255.0.0.0
UP BROADCAST RUNNING PROMISC MULTICAST MTU:1500 Metric:1
eth1 Link encap:Ethernet HWaddr 00:0C:29:1F:F7:FC
inet addr:1.X.X.X Bcast:1.X.X.255 Mask:255.255.255.0
UP BROADCAST RUNNING MULTICAST MTU:1500 Metric:1
lo Link encap:Local Loopback
inet addr:127.0.0.1 Mask:255.0.0.0
UP LOOPBACK RUNNING MTU:16436 Metric:1
tap0 Link encap:Ethernet HWaddr 7A:DD:C3:66:AA:2C
UP BROADCAST RUNNING PROMISC MULTICAST MTU:1500 Metric:1
You also have to add these to allow traffic. They will work, even if iptables is off.
# iptables -A INPUT -i tap0 -j ACCEPT
# iptables -A INPUT -i br0 -j ACCEPT
# iptables -A FORWARD -i br0 -j ACCEPT
3.5 Starting at boot
Now, set it all up to start automatically. You likely will need to add a route command so the VPN is available on the inside network from areas other than the subnet.
# pwd
#/etc/rc.d/rc3.d
# vi S99local
/etc/bridge-start
service openvpn start
route add -net 10.0.0.0 netmask 255.0.0.0 gw 10.X.X.X
Then get the server.conf file configured.
Make sure this line is in there:
plugin /usr/share/openvpn/plugin/lib/openvpn-auth-pam.so login
Details of what should be in the conf file can be found by looking at a sample.
Then start the openvpn service:
service openvpn start
If there is a FAILURE to start, check the openvpn.log to see what is going on. I find tail –f in a separate window is very handy, as it is a live look at the log file.
vi /etc/sysconfig/network and set the gateway to the outside address.
Next, we will set up the client.
30 July 2009
Dual factor OpenVPN with Active Directory and Certificate Services (Part 2 of 4)
2 Building Active Directory Integration
Joining this box to the active directory (AD) domain is the first part of our two-factor authentication. Authconfig-tui should have done most of this, but double-check your files. It is good to know what is what in case you need to trouble-shoot. And if you are using a different distro, you may still need to do this manually.
2.1 Setting Name services
Point the machine to winbind services. Authconfig-tui should have made all these changes.
2.1.1 Modify /etc/nsswich.conf
# vi /etc/nsswitch.conf
passwd: files winbind
shadow: files winbind
group: files winbind
2.1.2 Modify /etc/hosts
Add the AD controller to /etc/hosts. This is optional and not done by authconfig-tui.
# vi /etc/hosts
127.0.0.1 openvpn.yourdomain.com localhost.localdomain localhost
192.168.1.1 DOMAINCONTROLLER.YOURDOMAIN.COM DOMAINCONTROLLER
2.1.3 Set Kerberos authentication
Authenticating is locked through the kb5 settings. Authconfig-tui should have made all these changes.
These changes are made in /etc/krb5.conf
# less krb5.conf
[logging]
default = FILE:/var/log/krb5libs.log
kdc = FILE:/var/log/krb5kdc.log
admin_server = FILE:/var/log/kadmind.log
[libdefaults]
default_realm = YOURDOMAIN.COM
dns_lookup_realm = false
dns_lookup_kdc = false
ticket_lifetime = 24h
forwardable = yes
[realms]
YOURDOMAIN.COM = {
kdc = DOMAINCONTROLLER.YOURDOMAIN.COM:88
}
[domain_realm]
.yourdomain.com = YOURDOMAIN.COM
yourdomain.com = YOURDOMAIN.COM
[kdc]
profile = /var/kerberos/krb5kdc/kdc.conf
[appdefaults]
pam = {
debug = false
ticket_lifetime = 36000
renew_lifetime = 36000
forwardable = true
krb4_convert = false
}
2.1.4 Samba adjustments
Don’t forget smb.conf! /etc/samba/smb.conf will need some adjustments. Basically adding the last three lines will prevent the VPN server from trying to become the master SMB browser. Changing winbind default domain to “true” means users do not have to type “YOURDOMAIN” when they logon.
# vi /etc/samba/smb.conf
workgroup = YOURDOMAIN
password server = DOMAINCONTROLLER.YOURDOMAIN.COM
realm = YOURDOMAIN.COM
security = ads
idmap uid = 16777216-33554431
idmap gid = 16777216-33554431
template shell = /sbin/nologin
winbind use default domain = true
winbind offline logon = false
domain master = no
local master = no
preferred master = no
2.2 About services…
To check if a service is running in CentOS/Redhat distros:
service
Starting a service:
service
Stopping a service:
service
Have a service start automatically at boot:
1. Open the ntsysv program:
# ntsysv
2. Find your service in the list and press space to enable it. Services marked with a * will start automatically at boot.
2.3 Join the machine to the Active Directory Domain
Start the smb nmb services:
# service smb start
Check your clock. If needed, start the ntp daemon:
# vi /etc/ntp.conf to point to a different ntp server set.
# service ntpd restart
You cannot join the domain if your time is too far off. Without ntp, if your time drifts later, you will not be able to authenticate users.
This machine is now ready to be joined to AD. I prefer the command, instead of authconfig-tui, because errors appear right there, as does confirmation.
# net ads join -U domain-admin
domain-admin's password:
Using short domain name -- YOURDOMAIN
Joined 'openvpn to realm 'YOURDOMAIN.COM'
Once this is done, confirmation can be made in AD itself.
This machine is then moved to the appropriate AD OU.
Start winbind:
# service winbind start
You can run some checks to make sure all is working. If it is not, you should stop and troubleshoot.
Test 1: Get a list of all the users in the domain:
# wbinfo -u
Test 2: Get a list of groups in the domain:
# wbinfo -g
If those lists do not have domain users and domain groups, then something is not working. Again, you should stop and troubleshoot. NOTE: if this command appears to hang that likely means it IS working. Give it time, it is pulling all of the AD info, which is a lot of data.
Some other tests:
Get a kerberos ticket with kinit and a domain user.
# kinit
Type the password for the user and check with klist
# klist
You should see information about tickets being issued.
2.4 Autostart the services
If everything is working, set smb and winbind to autostart by using the ntsysv command.
2.5 PAM Configuration
In the old days I had to do extensive PAM modifications to get things working. PAM is the main authentication module. OpenVPN will plug into this for authentication. But now this seems unnecessary.
Congratulations! Your now have a Linux box that knows about Active Directory. Next is installing and configuring OpenVPN.
29 July 2009
Dual factor OpenVPN with Active Directory and Certificate Services (Part 1 of 4)
0. Overview
OpenVPN integrates well with Active Directory and Active Directory Certificate Services, providing a low-cost, dual factor VPN solution for Windows clients. Dual factor OpenVPN with Active Directory and Certificate Services
This HOWTO uses CentOS 5.3, the latest “stable” OpenVPN package 2.0.9, and assumes you already have AD and Certificate Services running. This VPN configuration is a bridge, meaning users have full TCP/IP access to the internal network once connected.
We will cover configuration in four main parts:
Part 1 - Base OS install
Part 2 - AD Integration
Part 3 - OpenVPN installation
Part 4 - Client Setup
Sample configurations will be included as a fifth part.
1 Base OS Setup
The goal is to make this appliance light. But for ease sake, not every package has been removed. This is a tight box, but not ultra-light. This box has no GUI, it is command line only. Knowledge of vi is recommended.
If you really need step-by-step screen shots, I may add later.
1.1 Base Configuration:
This machine needs two NICs. The drives are mirrored.
1.2 Networking
Two NICs are configured for different networks…disable ipv6 because it is not needed. The default gateway should be your EXTERNAL nic’s gateway. DNS should be your INTERNAL DNS address.
1.3 Disk format
Disk does not need to be more than about 5GB. Split off /var so that logs to not clobber the VPN. Not seen here is the /boot partiion which is about 100MB.
1.4 Packages
This build is based on CentOS 5.3, which is Redhat Enterprise 5.3 upstream.
The packages installed initially include
Applications > Editors (vi enhanced)
Servers > Windows File Server
Base > Admin Tools (not needed)
> Base (took out wireless tools, ypbind, Bluetooth, infrared references)
> System Tools (take out Bluetooth, vnc references)
CentOS Extras > Yum Utilities
Additional packages will be needed for OpenVPN, but will be added later: bridge-utils, samba-common, pam-devel
1.5 After the reboot
After the reboot, setup will run, which appears as a blue-red text box.
Firewall > Disable SELinux and allow port 443 inbound (SSH already allowed). Later, we will make additional firewall changes.
System Services > disable cups, Bluetooth, pcscd, winbind (winbind we’ll start later). Enable ntpd.
Authentication
In the olden days, my (in)experience, authconfig-tui often created a mess, and so I would edit each file needed for the system to use winbind before being joined to the domain. But now, authconfig-tui does a decent job -- though some adjustment will still be needed.
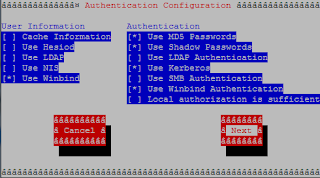
 Exhibit 2: Admin Server is optional. Enter your domain's info.
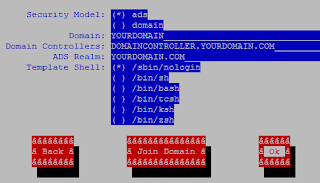
When done, close this out. You can get to this page at any time by typing setup.
Install pam-devel + bridge-utils + samba-common (no 's' at the end):
# yum install pam-devel bridge-utils samba-common
Reboot again. You are now done with OS installation. Next, we will join the system to the domain.
OpenVPN integrates well with Active Directory and Active Directory Certificate Services, providing a low-cost, dual factor VPN solution for Windows clients. Dual factor OpenVPN with Active Directory and Certificate Services
This HOWTO uses CentOS 5.3, the latest “stable” OpenVPN package 2.0.9, and assumes you already have AD and Certificate Services running. This VPN configuration is a bridge, meaning users have full TCP/IP access to the internal network once connected.
We will cover configuration in four main parts:
Part 1 - Base OS install
Part 2 - AD Integration
Part 3 - OpenVPN installation
Part 4 - Client Setup
Sample configurations will be included as a fifth part.
1 Base OS Setup
The goal is to make this appliance light. But for ease sake, not every package has been removed. This is a tight box, but not ultra-light. This box has no GUI, it is command line only. Knowledge of vi is recommended.
If you really need step-by-step screen shots, I may add later.
1.1 Base Configuration:
This machine needs two NICs. The drives are mirrored.
1.2 Networking
Two NICs are configured for different networks…disable ipv6 because it is not needed. The default gateway should be your EXTERNAL nic’s gateway. DNS should be your INTERNAL DNS address.
1.3 Disk format
Disk does not need to be more than about 5GB. Split off /var so that logs to not clobber the VPN. Not seen here is the /boot partiion which is about 100MB.
1.4 Packages
This build is based on CentOS 5.3, which is Redhat Enterprise 5.3 upstream.
The packages installed initially include
Applications > Editors (vi enhanced)
Servers > Windows File Server
Base > Admin Tools (not needed)
> Base (took out wireless tools, ypbind, Bluetooth, infrared references)
> System Tools (take out Bluetooth, vnc references)
CentOS Extras > Yum Utilities
Additional packages will be needed for OpenVPN, but will be added later: bridge-utils, samba-common, pam-devel
1.5 After the reboot
After the reboot, setup will run, which appears as a blue-red text box.
Firewall > Disable SELinux and allow port 443 inbound (SSH already allowed). Later, we will make additional firewall changes.
System Services > disable cups, Bluetooth, pcscd, winbind (winbind we’ll start later). Enable ntpd.
Authentication
In the olden days, my (in)experience, authconfig-tui often created a mess, and so I would edit each file needed for the system to use winbind before being joined to the domain. But now, authconfig-tui does a decent job -- though some adjustment will still be needed.

Exhibit 1: authconfig-tui -- windbind should be selected
 Exhibit 2: Admin Server is optional. Enter your domain's info.
Exhibit 3: winbind will be adjusted later.
Do NOT join to the domain yet. Chances are your clock-skew will not allow it.
Do NOT join to the domain yet. Chances are your clock-skew will not allow it.
When done, close this out. You can get to this page at any time by typing setup.
Install pam-devel + bridge-utils + samba-common (no 's' at the end):
# yum install pam-devel bridge-utils samba-common
Reboot again. You are now done with OS installation. Next, we will join the system to the domain.
Subscribe to:
Posts (Atom)